There’s a moment each autumn when leaves land along the edges of everything: porches, windowsills, garden paths. This crochet table runner brings that look indoors. A light, lacy filet mesh forms the center, and a border of tiny maple leaves in three warm shades frames it like a fresh pile of fallen foliage.
It’s a free crochet pattern, written in US terms, and it works for everyday decor as well as a Thanksgiving table.
Why You’ll Love This Table Runner
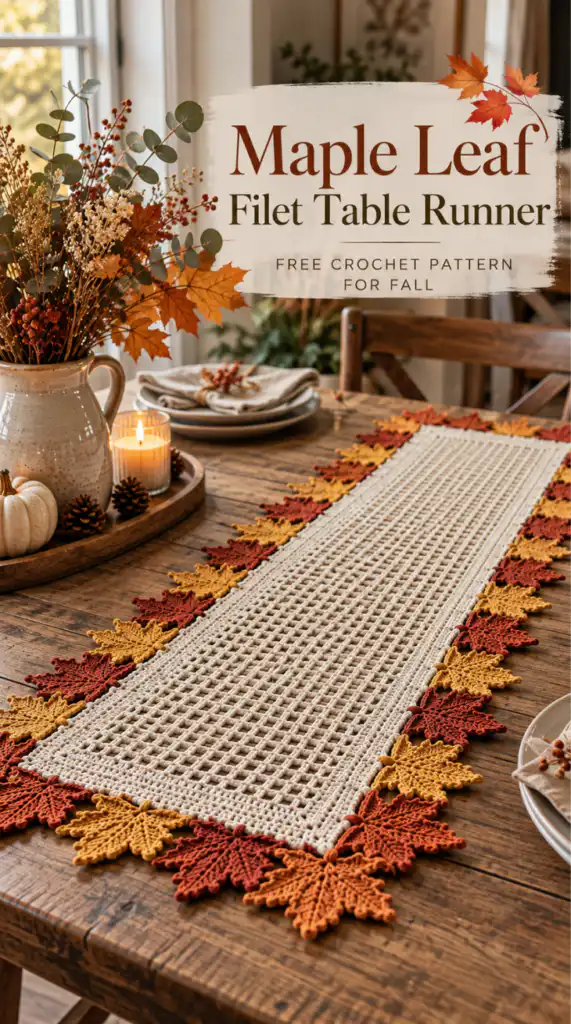
- The mesh center is easy to memorize, so you can crochet it while chatting or watching TV.
- The leaves are small, portable and satisfying, ideal for using up cotton scraps.
- The mix of airy lace and textured leaves looks far more complicated than it is.
- It’s easy to resize, and it’s machine washable in cotton.
Finished Size
The center panel measures about 8 inches wide by 28 inches long. Each leaf reaches roughly 3 inches beyond the mesh, so the finished runner measures about 14 x 34 inches with the leaf border.
Skill Level
Intermediate. You should be comfortable with double crochet, chain spaces and working in a mesh grid. The leaves involve a few special stitches and joining steps, but once you’ve made one, the rest go quickly.
How Long Will It Take?
Plan on 16 to 21 hours in total:
- Center mesh panel: 3 to 4 hours
- Edging round: about 1 hour
- 42 maple leaves: 10 to 13 hours (about 15 to 18 minutes each)
- Blocking and assembly: 2 to 3 hours
Materials
Yarn: smooth cotton in DK or light worsted weight. Smooth, tightly spun cotton shows off both the mesh and the leaf details.
- Main Color (MC), cream: about 220 yards (200 m)
- Color A (CA), rust: about 130 yards (119 m)
- Color B (CB), mustard gold: about 130 yards (119 m)
- Color C (CC), terracotta: about 130 yards (119 m)
- Total: about 610 yards (558 m)
Hook: US G-6 (4.0 mm), or the size that gets you gauge.
Notions: tapestry needle, rust-proof pins, blocking mat or towels, scissors, stitch markers (optional).
Yarn ideas: Lion Brand 24/7 Cotton, Paintbox Yarns Cotton DK, or WeCrochet Dishie. Pick cream, rust, mustard and terracotta shades. Avoid fuzzy or loosely spun yarns, which hide the mesh.
Gauge
- Mesh: 18 sts and 9 rows = 4 inches (10 cm), blocked
- One leaf: about 3 x 3 inches, blocked
Swatch first. If you’re off, go up or down a hook size until you match.
Abbreviations (US Terms)
- ch = chain
- ch-sp = chain space
- dc = double crochet
- hdc = half double crochet
- sc = single crochet
- sl st = slip stitch
- sk = skip
- st(s) = stitch(es)
- rep = repeat
- RS = right side
- MC / CA / CB / CC = main color / color A / color B / color C
Special Stitches
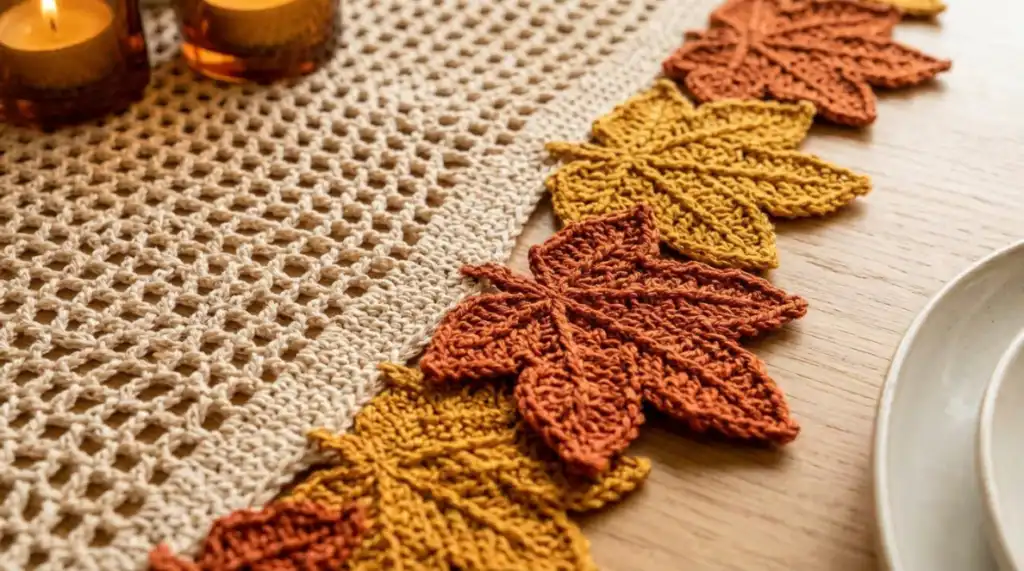
Mesh space: ch 1, skip 1 stitch or ch-sp, dc in the next stitch. Each dc “post” anchors into the dc of the row below, and the ch 1 bridges the space underneath.
Picot: ch 3, sl st into the first of those 3 chains (the one farthest from the hook). It makes a tiny point at each leaf tip.
Before You Start
- The center is worked back and forth in rows, with the foundation chain running along the length of the runner.
- Make the leaves separately and sew them on after blocking.
- Alternate leaf colors in the order CA, CB, CC around the whole edge.
- Block the panel and every leaf before assembly. It makes a big difference.
Center Mesh Panel
Using MC and the G-6 hook:
Foundation: ch 130.
Row 1 (RS): dc in the 6th ch from the hook (the skipped chains count as the first dc and the first space). Ch 1, sk 1 ch, dc in the next ch. Rep from * across. Turn. (63 spaces, 64 dc posts)
Row 2: ch 4 (counts as dc + ch 1). Sk the first ch-sp, dc in the next dc. Ch 1, sk ch-sp, dc in the next dc. Rep from * across, ending with a dc in the 3rd ch of the previous turning chain. Turn. (63 spaces)
Rows 3 to 18: rep Row 2.
Do not fasten off.
Check: the blocked panel should be about 8 inches wide and 28 inches long. If it’s more than half an inch off, recheck your gauge.
Edging Round
This round of sc gives the leaves a firm edge to attach to.
Round 1: ch 1, do not turn. Work sc evenly around the panel:
- Top edge: 1 sc in each dc post and each ch-sp. (127 sc)
- Corner: 3 sc in the corner. (3 sc)
- Short side: about 2 sc per row-end. (36 sc)
- Corner: 3 sc. (3 sc)
- Bottom edge (foundation chain): 127 sc evenly. (127 sc)
- Corner: 3 sc. (3 sc)
- Second short side: 36 sc. (36 sc)
- Corner: 3 sc. (3 sc)
Sl st to the first sc and fasten off. Weave in the end. Put a marker in the middle stitch of each corner.
Maple Leaf Motif
Make 42 leaves: 14 in CA, 14 in CB and 14 in CC. Each leaf has five lobes fanning out from a central ring.
Base ring: ch 4, sl st to the first ch to close the ring (or use a magic ring).
Round 1: ch 1, 8 sc into the ring, sl st to the first sc. (8 sc)
Stem: ch 5. Sl st in the 2nd ch from the hook and in each of the next 3 chs. Sl st into the ring.
Lobe 1 (lower right): ch 9, turn. Dc in the 4th ch from the hook, dc in each of the next 2 chs, hdc in the next ch, sc in the next ch, sl st in the last ch next to the ring. (3 dc, 1 hdc, 1 sc, 1 sl st)
At the tip, make a picot, then work back down the other side of the lobe: sc, hdc, dc, dc, and sl st into the ring.
Lobe 2 (lower left): same as Lobe 1, mirrored on the other side of the ring.
Lobe 3 (middle right): ch 11, turn. Dc in the 4th ch from the hook, dc in each of the next 4 chs, hdc, sc, sl st next to the ring. (5 dc, 1 hdc, 1 sc, 1 sl st) Picot at the tip, then work down the other side as for Lobe 1.
Lobe 4 (middle left): same as Lobe 3, mirrored.
Lobe 5 (top center): ch 13, turn. Dc in the 4th ch from the hook, dc in each of the next 6 chs, hdc, sc, sl st next to the ring. (7 dc, 1 hdc, 1 sc, 1 sl st) Picot at the tip, then work down the other side.
Finish: join MC to the ring with a sl st, sc in each stitch around the ring to neaten it, sl st to join. Fasten off, leaving a 12-inch tail for sewing.
Check: make one leaf, block it and compare it to 3 x 3 inches before making the rest.
Assembly and Blocking
- Weave in all ends on the panel and on every leaf.
- Wet block the panel in cool water. Press out the water in a towel and pin it to 8 x 28 inches to dry completely.
- Block each leaf with all five lobe tips pulled outward.
- Lay the panel flat, right side up. Pin leaves around the edge with the tips pointing outward: 14 along each long side and 7 along each short end, alternating CA, CB, CC.
- Let the leaves overlap slightly at the corners and ends. If the short ends feel crowded, use 5 leaves instead.
- Step back and check the spacing before you sew anything.
- Whip stitch each leaf base to the edging with its tail. Tack the lower lobes so they don’t flip.
- Weave in the tails and steam lightly if needed.
Size Adjustments
- Longer or shorter: add or remove 18 chains for every 4 inches. Add or remove about 2 leaves per long side for each 4 inches.
- Wider: add 9 rows for every extra 4 inches, and one leaf on each short end for every extra 2 inches.
Care
Machine wash gently in cool water in a mesh bag with mild detergent. Lay flat to dry. No tumble drying, wringing or bleach. Store it flat or rolled, not folded.
FAQ
What yarn is best for a crochet table runner?
Smooth cotton or a cotton blend. It holds its shape, tolerates washing and shows off lace clearly.
Can I make this table runner in one color?
Yes. A single fall shade like rust or mustard gives a calm, modern look.
How do I keep the leaves from curling?
Block each leaf with the tips pinned out, and tack the lower lobes to the edging when you sew.
Can I use this for Thanksgiving?
Definitely. The warm colors and leaf border suit a harvest table.
Final Thoughts
This maple leaf table runner mixes an easy lace center with a handful of small leaves, and the result looks like it took much longer than it did. Once you’ve finished yours, pin it to your Pinterest boards and share a photo in the comments. I’d love to see your colors.