Some crochet bags look adorable in photos and then slouch the minute you put your phone inside. This one doesn’t. It’s worked in single crochet with 2 mm macramé cord, so the fabric comes out dense, structured, and ready for everyday use.
The little flap closes with a metal bag lock, and the handle is crocheted in the same stitch so everything matches. It’s a great project if you already know single crochet and want to try something that looks store-bought. It also makes a lovely handmade gift.

What You’ll Need
Yarn: 2 mm macramé cord (100% polypropylene works beautifully). You’ll need about 251 yards (230 m), which is roughly one 200 g (7 oz) skein.
Hook: 3.5 mm (E/4)
Hardware:
- 1 bag lock, 46 mm × 44 mm
- 2 metal D-rings, 16 mm (5/8″) inner width
- 2 metal swivel clasps (carabiners), 25 mm (1″) inner width
Other notions: measuring tape, scissors, stitch markers, tapestry needle
Gauge: 17 sc × 13 rows = 4″ (10 cm). Use whatever hook size gives you this gauge after blocking.
Finished Size
When you use similar materials, your bag will measure:
- Width: 7.3″ (18.5 cm)
- Height: 4.5″ (11 cm)
- Depth: 1.5″ (4 cm)
- Handle length: 27.5″ (70 cm)
Abbreviations (US Terms)
- ch – chain
- sc – single crochet
- sl-st – slip stitch
- BLO – back loop only
- FLO – front loop only
- dec – decrease (work 2 sc together)
- inc – increase (2 sc in the same stitch)
- PM – place marker
- rep – repeat
- RS / WS – right side / wrong side
Step 1: The Main Body
Leave a long tail of about 10″ (25 cm), then chain 31.
Tip: Want a wider or narrower bag? Just chain more or fewer stitches.
Row 1: Sc in the 2nd ch from the hook and in each ch across (30 sc). Ch 1, turn.
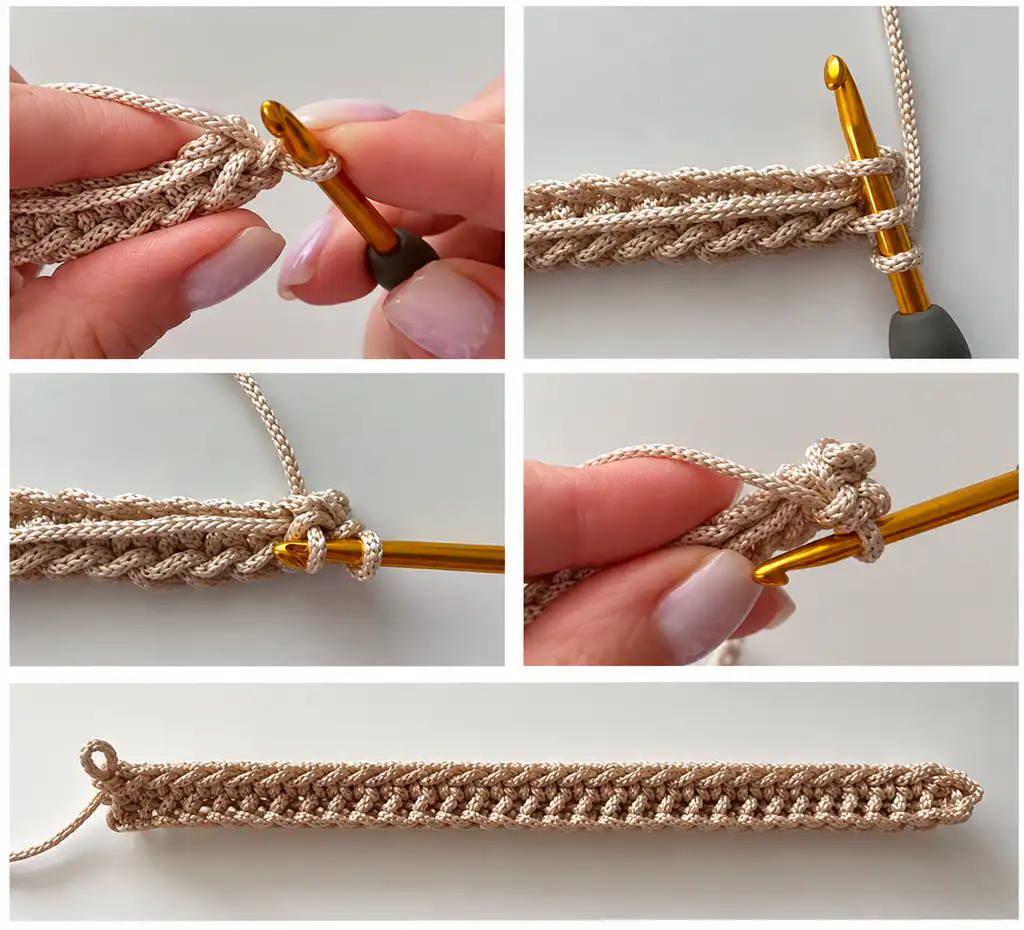
Now lay the long tail along the top of your work. You’ll crochet over it in the next row.
Row 2: Work 30 sc, inserting your hook into the back loop of the stitch in your current row and the loop of the foundation chain at the same time. Ch 1, turn.
Gently straighten the start of your fabric and adjust the tail so the first rows aren’t stretched out.
Row 3 (main pattern): Work 30 sc, inserting your hook into the back loop of the current row and the back loop of the previous row. Ch 1, turn.
Repeat Row 3 until your piece measures 13.8–14″ (35–36 cm). I ended up with 90 rows.
Steam your fabric and shape it into a neat rectangle. Measure the length and width, then place stitch markers along the bottom and sides. You can fold the piece along the markers to preview the size of the finished bag. As a guide, the body folds into roughly 4.3″ (11 cm) for the back, a bottom of about 1.1″ (3 cm), 4.3″ (11 cm) for the front, and the remaining length becomes the flap.
Step 2: The Side Panels (Make 2)
Chain 5.
Row 1: Sc in the 2nd ch from the hook and in each ch across (4 sc). Ch 1, turn.
Rows 2–25: Work 4 sc in each row, following the main pattern. Ch 1, turn.
Row 26: Sl-st in each of the 4 stitches.
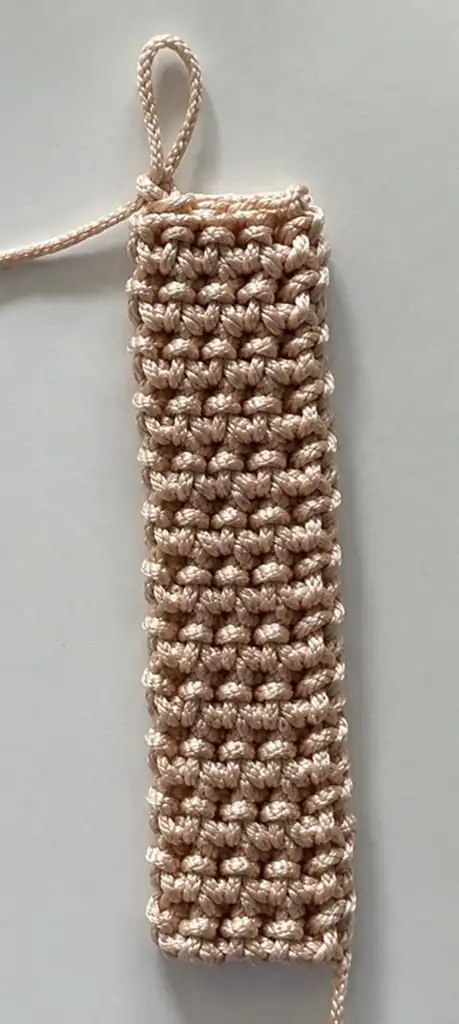
Cut the yarn. Straighten and steam each side panel. Each one should measure about 4″ (10 cm) long and 1.1″ (3 cm) wide.
Step 3: Assembly
Start with the left side panel. Place it against the main body and line up the corners.
Insert your hook into the back loop of the main body and the front loop of the side panel. You’ll have 3 loops on your hook. Pull the working yarn through all 3 loops. Work slip stitches this way along the three sides of the side panel.
Don’t cut the yarn yet. Keep slip stitching along the main body to the corner, then up to the middle of the flap. Cut the yarn.
Attach the right side panel the same way. Weave in all your ends, then mark the center of the flap.

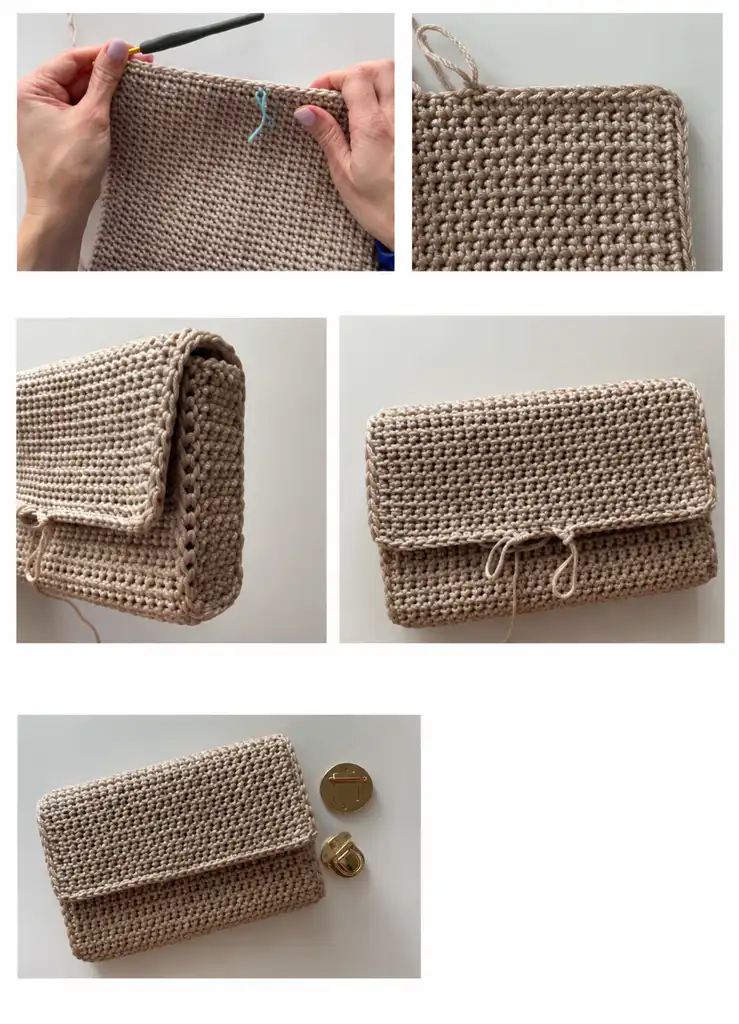
Adding the hardware:
- Attach the bag lock to the top of the flap first.
- Attach the matching part of the lock to the front of the bag body.
- Sew a D-ring to each side of the bag, ready for the handle.
Step 4: The Handle
You can use a ready-made strap or crochet one to match. I like using 1″ (2.5 cm) carabiners because they make the handle easy to swap or remove.
Leave a 6″ (15 cm) tail, then chain 4.
Row 1: Sc in the 2nd ch from the hook and in each ch across (3 sc). Ch 1, turn.
Rows 2 onward: Work 3 sc in each row, following the main pattern. Ch 1, turn.
Keep going until the handle is the length you like. Mine is a medium length of 26″ (67 cm), which took 146 rows.
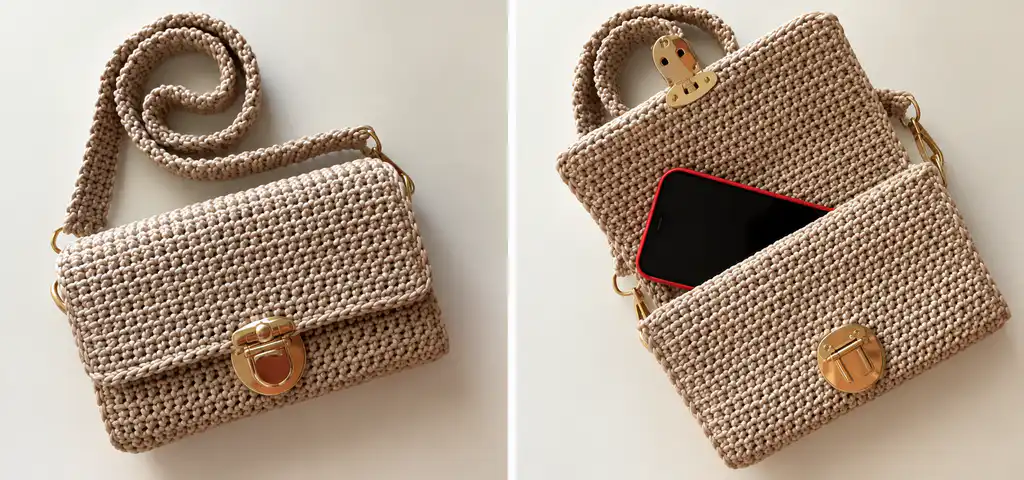
Clip the handle onto the D-rings with your carabiners, weave in the ends, and your bag is done.
Tips for the Best Results
- Steam as you go. Blocking the body and side panels makes the assembly much smoother.
- Use stitch markers when joining the sides so the corners match.
- Check your gauge. With cord this thin, a tiny change in tension can change the bag size.
- Make it your own. Change the chain count to adjust the width, and the number of rows to adjust the height.
Frequently Asked Questions
Can I use cotton yarn instead of macramé cord?
Yes. Check your gauge first, since cotton is softer and the bag may be a bit less rigid.
What’s the best yarn for a structured crochet bag?
Polypropylene or cotton macramé cord keeps its shape well and handles daily wear.
Can I make the bag bigger?
Absolutely. Add stitches to the foundation chain for more width, and rows for more height. Adjust the side panels to match.
Final Thoughts
This little flap bag is quick to make, holds its shape, and looks polished with its clasp and matching handle. If you make one, I’d love to see it. Tag me on Pinterest, and save this pattern for later!