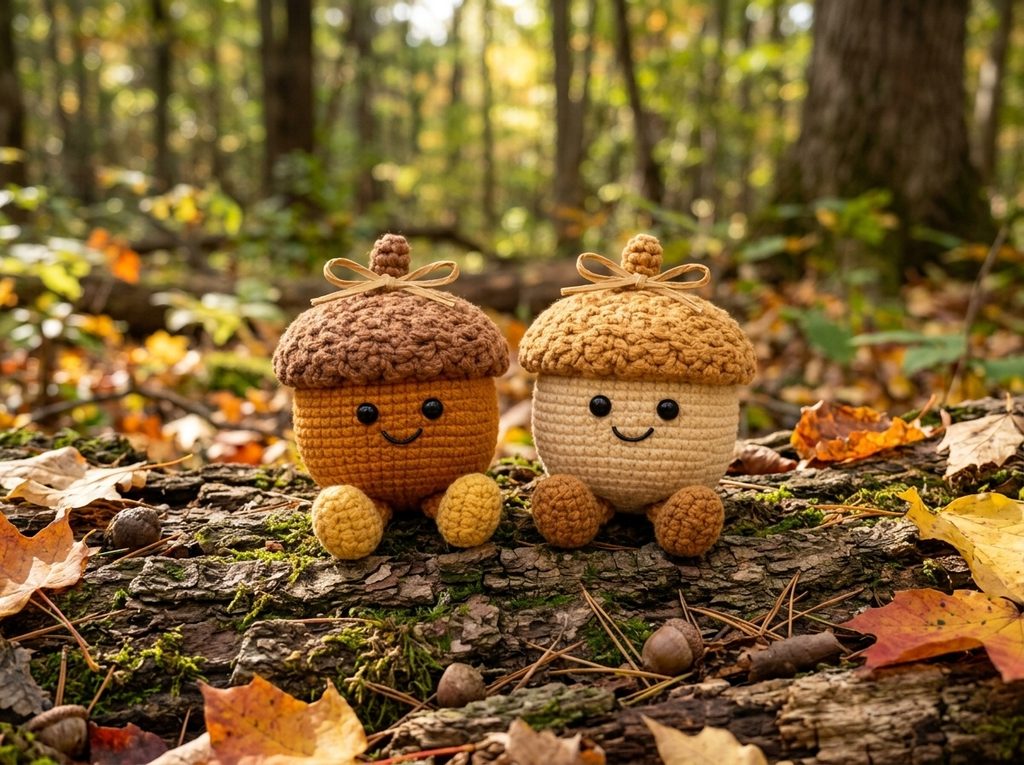
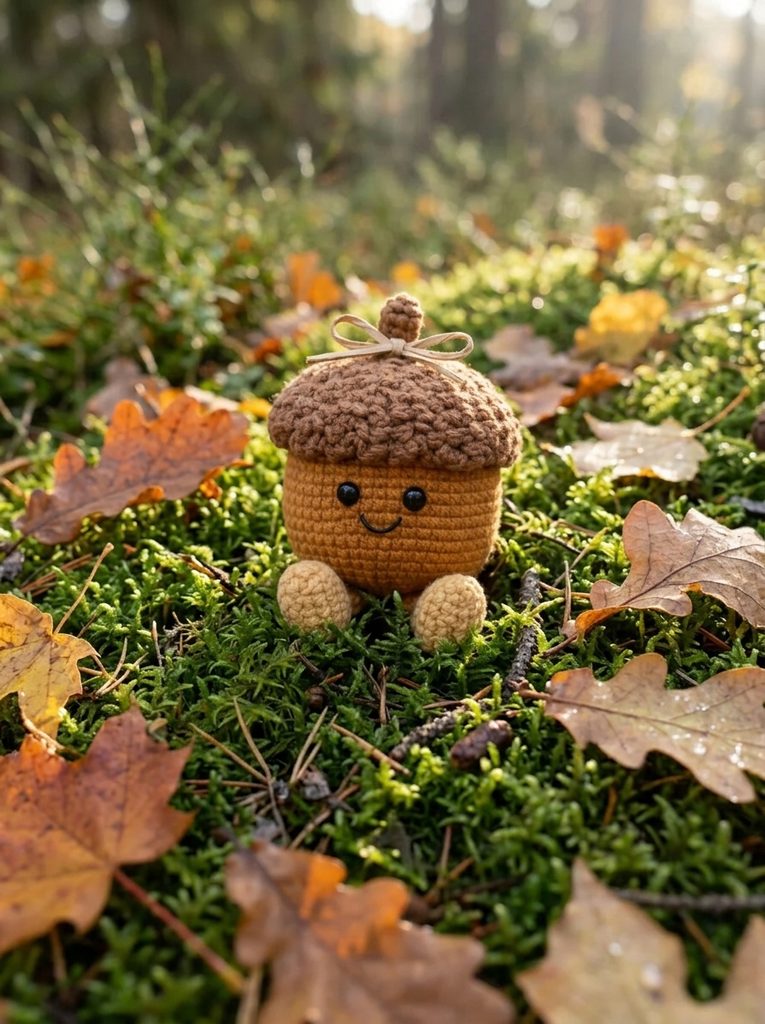
If you’ve ever scrolled past those smiling little “amuseable” plushies and thought, I need one of those on my shelf, this acorn is for you. It’s round, squishy, and a little goofy, with a bumpy cap, a tiny stem, and two stubby feet that keep it standing upright.
The best part is the cap. Instead of sewing on a separate piece, you work little chain loops straight into the leftover front loops of the body. It looks like fluffy, layered texture, but it’s just chains and slip stitches. No fancy stitches, no tricky shaping.
Below you’ll find the full free amuseable acorn crochet pattern, plus tips to help it come out neat on the first try.
Why You’ll Love This Acorn
- Quick to finish. A few small pieces and one simple body, so it works up in an evening or two.
- Beginner-friendly. If you can make a magic ring, increases, and decreases, you can make this.
- Great texture without extra work. The cap is made of chain loops, not complicated stitches.
- Perfect for autumn. Think fall shelf décor, cozy bag charm, or a handmade gift.
- Easy to customize. Swap colors, change the face, or add a bow.
Materials You’ll Need
- Medium brown yarn for the body
- Dark brown yarn for the cap and stem
- Light tan or beige yarn for the feet
- A crochet hook that matches your yarn (go a size down for tight stitches so the stuffing doesn’t show)
- 6 mm safety eyes (or black thread if you’d rather embroider)
- Black embroidery thread for the smile
- Polyester fiberfill
- Stitch marker
- Yarn needle and scissors
A quick tip: pick a yarn weight you’re comfortable with. The finished size depends entirely on your yarn and hook, so a thicker yarn gives you a bigger acorn.
Abbreviations (US Terms)
- MR – magic ring
- sc – single crochet
- inc – 2 sc in the same stitch
- dec – single crochet two together
- BLO – back loop only
- FLO – front loop only
- ch – chain
- sl st – slip stitch
Work in continuous rounds without joining, and use your stitch marker to keep track of where each round starts.
Free Amuseable Acorn Crochet Pattern
Acorn Base (medium brown)
- Rnd 1: MR, 8 sc (8)
- Rnd 2: inc in every stitch (16)
- Rnd 3: 1 sc, inc, repeat 8 times (24)
- Rnd 4: 1 sc, inc, 1 sc, repeat 8 times (32)
- Rnd 5: 3 sc, inc, repeat 8 times (40)
- Rnd 6: 2 sc, inc, 2 sc, repeat 8 times (48)
- Rnds 7–8: 1 sc in each stitch (48)
- Rnd 9: 7 sc, inc, repeat 6 times (54)
- Rnds 10–18: 1 sc in each stitch (54)
From here, work in the back loops only. This leaves the front loops untouched. You’ll need them for the cap.
- Rnd 19: 7 sc, dec, repeat 6 times (48)
- Rnds 20–21: 1 sc in each stitch (48)
- Rnd 22: 2 sc, dec, 2 sc, repeat 8 times (40)
- Rnd 23: 3 sc, dec, repeat 8 times (32)
- Rnd 24: 1 sc, dec, 1 sc, repeat 8 times (24)
- Rnd 25: 1 sc, dec, repeat 8 times (16)
- Rnd 26: dec 8 times (8)
Stuff the body firmly. A plump acorn looks much cuter than a floppy one. Thread the yarn tail through the front loops of the last 8 stitches, pull the opening closed, then fasten off and weave in the end.
Important: don’t trim or disturb the free front loops from Rnds 19 to 26. The cap is made from them.
Bumpy Cap Texture (dark brown)
Repeat these steps for each round from 19 to 26, one round at a time:
- Attach dark brown yarn to any free front loop of that round.
- All the way around: ch 3, then sl st into the next free front loop.
- Fasten off.
- Move up to the next round and repeat.
When you’re done, you’ll have stacked rows of little loops that look like a chunky, textured cap.
Texture tips:
- Keep your chains relaxed. If you pull them tight, the loops won’t stand out.
- Want a fluffier cap? Make each chain 4 stitches long instead of 3.
- Hide the joining spots at the back of the acorn.
Stem (dark brown)
- Rnd 1: MR, 6 sc (6)
- Rnd 2: 1 sc, inc, repeat 3 times (9)
- Rnd 3: inc, 7 sc, inc (11)
- Rnd 4: 1 sc in each stitch (11)
- Rnd 5: 4 sc, dec, 5 sc (10)
- Rnd 6: 1 sc in each stitch (10)
- Rnd 7: 4 sc, dec, 4 sc (9)
Add a tiny bit of stuffing, just enough to hold the shape. Fasten off and leave a long tail for sewing.
Feet, make 2 (light tan)
- Rnd 1: ch 6. Starting in the 2nd chain from the hook: 4 sc, 3 sc in the last chain. Continue along the other side of the chain: 3 sc, inc (12)
- Rnd 2: inc, 3 sc, inc 3 times, 3 sc, inc 2 times (18)
- Rnd 3: 1 sc in the back loop of each stitch (18)
- Rnd 4: 5 sc, dec 3 times, 7 sc (15)
- Rnd 5: 2 sc, dec 5 times, 3 sc (10)
- Rnd 6: 2 sc, dec 3 times, 2 sc (7)
- Rnd 7: 2 sc, dec, 3 sc (6)
- Rnd 8: 1 sc in each stitch (6)
- Rnd 9: 1 sc, dec, 3 sc (5)
Add a small amount of stuffing, then fasten off with a long tail for sewing.
Adding the Face
The face is what turns a crocheted nut into a character, so take your time here.
- Eyes: Place the 6 mm safety eyes on the front, just below the textured cap. Keep them evenly spaced and not too high, since the cap already adds height. Pin them in place and step back before you lock them.
- Smile: Stitch a small curved smile with black thread, centered under the eyes. Keep it simple. A tiny smile gives the softest look.
- Making it baby-safe? Skip the safety eyes and embroider two small black stitches instead.
Assembly
- Feet: Sew both feet low on the front of the body, spaced evenly so the acorn sits upright without tipping.
- Stem: Use the long tail to sew the stem to the top center of the acorn.
- Weave in all remaining ends and give the acorn a gentle squeeze to even out the stuffing.
Tips for a Neat Finish
- Use a smaller hook than the label suggests. Tight stitches keep the fiberfill from peeking through.
- Stuff as you go. Add stuffing before you close the last rounds. It’s hard to fix lumps afterward.
- Mark your first stitch. With so many rounds of the same count, a stitch marker saves you from losing your place.
- Place the feet before sewing. Pin them first and check that the acorn stands properly.
Customization Ideas
- Make a mini version with thinner yarn and a smaller hook.
- Try a pastel or cream cap for a softer look.
- Tie a small ribbon bow around the stem for extra charm.
- Attach a keyring loop to the stem for a bag charm.
- Make a group of three in different sizes for a fall display.
Frequently Asked Questions
How big is the finished acorn?
It depends on your yarn and hook. Chunkier yarn gives a bigger acorn, while thinner yarn makes a smaller one.
Can I make this without safety eyes?
Yes. Embroider the eyes with black thread. This is also the safest option for babies and toddlers.
Do I have to use BLO for the shaping rounds?
Yes, this is what makes the cap texture possible. Working in the back loops leaves the front loops free for the chain loops.
What if my cap loops look uneven?
Keep your chains the same length and don’t pull them tight. A little irregularity actually adds to the bumpy look.
Can I use a different yarn?
Of course. Just keep the same yarn weight for all pieces so the proportions stay balanced.
Final Thoughts
This amuseable acorn crochet pattern is one of those projects that looks far more complicated than it is. A simple round body, a few chains, and a bit of patient stitching give you a soft little character with real personality. Make one for yourself, or a few for friends. They’re hard to give away, though.
If you try the pattern, I’d love to see your version. Share your acorn on Pinterest and tag me!