Some projects just make you smile the second they come off the hook, and this one is exactly that. This crochet bag keychain is a teeny, puffy handbag in a soft dusty mauve, with a chunky arched handle, a little front flap, and a cream daisy tucked into the corner. Add a bit of gold hardware and it looks like something you’d find in a boutique, except you made it yourself in an afternoon.
Clip it on your keys, hang it from a backpack zipper, or tie it onto a gift. It’s also a great little seller for craft fairs, since it’s small, quick, and uses hardly any yarn.
Why You’ll Love Making This Bag Charm

- It’s a real stash-buster. You only need small amounts of three colors.
- It makes a thoughtful handmade gift. Everyone has keys or a bag that needs a little personality.
- It’s a fun mix of techniques. You’ll make a stuffed body, a flap, a braided-look handle and a flower, but every piece is simple on its own.
- It’s easy to personalize. Swap the colors, change the flower, or skip the metal and use a crocheted loop instead.
Finished Size
About 6 cm (2.4 in) wide and 4.5–5 cm (1.8–2 in) tall, not counting the hardware. That’s with sport or DK cotton and a 2.25–2.5 mm hook.
Materials and Tools
- Sport or DK weight cotton yarn in dusty mauve (or soft pink), cream, and peach (or coral)
- 2.25 mm or 2.5 mm crochet hook
- Fiberfill
- Stitch marker
- Yarn needle
- Scissors
- Gold keyring
- 3 small gold chain links
- 1 small gold jump ring (for the handle)
- Pliers (optional, but they help close the jump ring securely)
Abbreviations (US Terms)
- MR: magic ring
- ch: chain
- sl st: slip stitch
- sc: single crochet
- hdc: half double crochet
- dc: double crochet
- inc: increase (2 sc in the same stitch)
- dec: decrease
- BLO: back loops only
- FLO: front loops only
- st / sts: stitch / stitches
- Rnd: round
- (…) x n: repeat the instructions in parentheses n times
Before You Start
This pattern makes one small stuffed bag. It’s purely decorative, so it doesn’t open. Crochet tightly so the fiberfill doesn’t peek through the stitches, and stuff lightly but firmly. You want it puffy and rounded, but still small enough to hang neatly from a keyring.
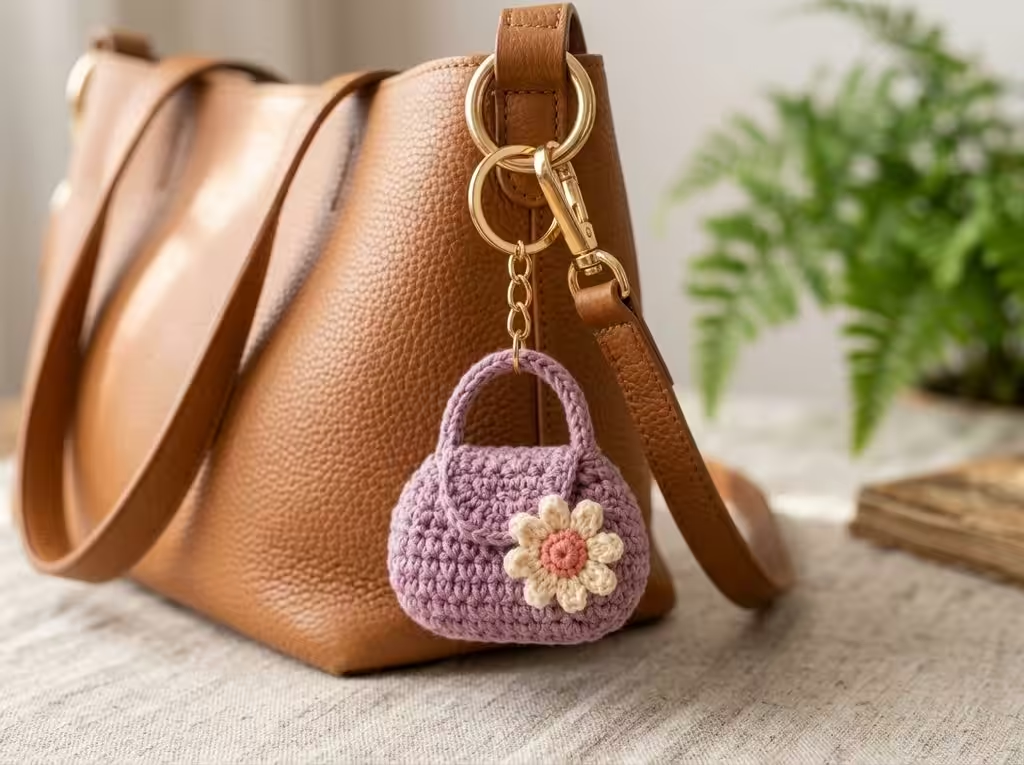
Crochet Bag Keychain Pattern
Bag Body
Use dusty mauve (or soft pink). Work in continuous rounds.
Ch 12.
Rnd 1: Starting in the 2nd ch from the hook, sc in the next 10 ch, work 3 sc in the last ch. Turn and work along the other side of the chain: sc in the next 9 ch, inc in the last ch. (24)
Rnd 2: Inc, sc in the next 9 sts, inc x 3, sc in the next 9 sts, inc x 2. (30)
Rnd 3: Sc in the next st, inc, sc in the next 9 sts, (sc in the next st, inc) x 3, sc in the next 9 sts, (sc in the next st, inc) x 2. (36)
Rnd 4: Sc in the next 2 sts, inc, sc in the next 9 sts, (sc in the next 2 sts, inc) x 3, sc in the next 9 sts, (sc in the next 2 sts, inc) x 2. (42)
Rnd 5: BLO sc around. (42)
Rnds 6–10: Sc around. (42)
Rnd 11: Sc in the next 9 sts, dec, sc in the next 19 sts, dec, sc in the next 10 sts. (40)
Rnd 12: Sc around. (40)
Rnd 13: Sc in the next 8 sts, dec, sc in the next 18 sts, dec, sc in the next 10 sts. (38)
Rnd 14: Sc around. (38)
Rnd 15: Sc in the next 7 sts, dec, sc in the next 17 sts, dec, sc in the next 10 sts. (36)
Rnd 16: (Sc in the next 4 sts, dec) x 6. (30)
Now add your fiberfill. Aim for a soft, rounded, slightly puffy shape, and don’t overstuff.
Rnd 17: (Sc in the next 3 sts, dec) x 6. (24)
Flatten the opening so the side edges line up. Sc through both layers across the top to close the bag. (12)
Fasten off and weave in the end.
Shaping the Bottom
Use dusty mauve (or soft pink).
- Thread a long strand of yarn onto your needle.
- Push the needle through from one lower corner of the bag to the other.
- Pull gently so the bottom flattens a little and becomes more oval.
- Make 2–3 hidden stitches along the lower corners.
- Knot securely and tuck the tail inside the bag.
Don’t pull too hard. The base should stay soft and rounded.
Front Flap
Use dusty mauve (or soft pink). Work in rows.
Ch 13.
Row 1: Starting in the 2nd ch from the hook, sc in the next 12 ch, ch 1, turn. (12)
Row 2: Sc across, ch 1, turn. (12)
Row 3: Sc across, ch 1, turn. (12)
Row 4: Dec, sc in the next 8 sts, dec, ch 1, turn. (10)
Row 5: Sc across. (10)
Don’t fasten off yet.
Border: Ch 1, then sc evenly around the flap, working 2 sc in each lower corner so the edge stays softly rounded. Sl st to the first border sc.
Fasten off, leaving a long tail for sewing.
Place the flap on the upper front of the bag. Sew down only the top edge and the upper part of the sides, so the bottom edge sits slightly lifted.

Thick Arched Handle
Use dusty mauve (or soft pink).
You’ll make 2 identical cords.
Ch 40. Starting in the 2nd ch from the hook, sl st in each ch across. (39)
Fasten off, leaving long tails at both ends.
Lay the two cords side by side and stitch them together with small hidden stitches to form one thicker handle. Curve it into a smooth arch, then sew one end to the upper left side of the bag and the other to the upper right side. Use plenty of firm stitches on each side, since this handle will carry the hardware.
Handle Base Wraps
Use dusty mauve (or soft pink).
Wrap yarn 2–3 times around the base of the left handle attachment, knot it, and hide the end inside the bag. Repeat on the right side.
This neatens the joins and keeps the handle steady when the charm hangs.
Daisy Petals
Use cream.
Rnd 1: 8 sc in MR. (8) Don’t fasten off.
Petal 1: Sl st in the next st, ch 4. Starting in the 2nd ch from the hook, sc in the next ch, hdc in the next ch, sc in the next ch, then sl st into the same center st.
Repeat Petal 1 around until you have 8 petals.
Fasten off and weave in the cream tail.
Daisy Center
Use peach (or coral).
Rnd 1: 6 sc in MR. (6)
Rnd 2: Inc around. (12)
Sl st to the first sc. Fasten off, leaving a long tail for sewing.
Set the peach center on the middle of the daisy and sew it down firmly, passing through the center several times.
Sewing On the Daisy
Place the daisy on the lower right front of the bag, slightly overlapping the flap. Use the peach tail to stitch through the center and into the bag body. Add one small hidden stitch behind 2–3 petals to keep the flower flat.
Don’t sew down every petal. Letting a few tips lift slightly gives it that soft, handmade look.
Adding the Gold Hardware
- Open the small gold jump ring.
- Slip it through the top center of the handle.
- Attach the 3 small gold chain links below the keyring.
- Connect the lowest chain link to the jump ring on the handle.
- Close every ring tightly, using pliers if needed.
The bag should hang from the middle of the handle with the daisy facing forward.
No Metal? Make a Crocheted Loop Instead
Use dusty mauve (or soft pink).
Ch 16. Starting in the 2nd ch from the hook, sl st in each ch back. (15)
Fasten off, leaving long tails. Fold the cord in half and sew both ends to the top center of the handle. Then slide the gold keyring through the loop.
Final Checks
Shape check:
- The body should be small, round and softly stuffed.
- The bottom should be slightly oval, not pointed.
- The top should be flatter and narrower than the lower body.
- The flap should sit on the upper front and curve gently downward.
- The handle should form a thick, clean arch.
- The daisy should sit on the lower right front.
Balance check: Hold the keyring and let the bag dangle.
- If it tips forward, add one hidden stitch from the back of the handle to the upper back of the bag.
- If it leans to one side, tighten the handle attachment on the opposite side.
- If the flap lifts too much, add a tiny stitch near one lower flap corner.
- If the flower drags the front down, add a small stabilizing stitch behind the flower center.
Assembly Order at a Glance
- Crochet the bag body.
- Stuff lightly and close the top.
- Shape the bottom with hidden stitches.
- Make the flap and sew it to the upper front.
- Make the two handle cords and sew them together.
- Attach the arched handle to both upper sides.
- Crochet the cream daisy and the peach center.
- Sew the daisy to the lower right front.
- Add the jump ring, chain links and keyring.
- Check the balance and reinforce every attachment point.
Color Guide
- Dusty mauve or soft pink: body, flap, handle, handle wraps, optional loop
- Cream: daisy petals
- Peach or coral: daisy center
- Gold: keyring, chain links, jump ring
- Use matching yarn tails for all hidden stitching
Tips for a Neat Finish
- Use cotton. It holds its shape better than acrylic, and the stitches stay crisp on such a small piece.
- Go down a hook size if you see stuffing. Tight stitches are the secret to a clean mini bag.
- Stuff in small pinches. Adding fiberfill bit by bit helps you avoid lumps.
- Test the handle before you attach it. Hold it up to the body to check the arch looks balanced.
- Close the rings well. A loose jump ring is the most common reason these charms fall off a bag.
Fun Ways to Customize
- Try sage green, baby blue or butter yellow for a whole mini collection.
- Swap the daisy for a tiny bow, a heart or a little sunflower.
- Make several in different colors and sell them as a set at your next craft fair.
- Attach one to a plain tote or pencil case as a finishing touch.
Frequently Asked Questions
Can I use a different yarn?
Yes, but cotton gives the best shape. If you use thicker yarn, the bag will come out larger, so go up a hook size only if you want a bigger charm.
Is this pattern beginner-friendly?
It’s best for confident beginners. You’ll need to be comfortable with magic rings, increases and decreases, and some light sewing.
Does the bag open?
No, it’s decorative and stuffed, so it’s meant to hang as a charm rather than hold anything.
How long does it take to make?
Most people finish it in an afternoon. The handle and the assembly are the parts that take the most time.
Can I sell what I make from this pattern?
Always check the original designer’s terms first. If you sell finished items, it’s good practice to credit the designer and link back to the pattern.
Wrapping Up
That’s your adorable crochet bag keychain. It’s small, cheerful, and surprisingly satisfying to put together. Make one for yourself, then another for a friend, because they go fast. If you try this pattern, I’d love to see yours, so tag me on Pinterest!