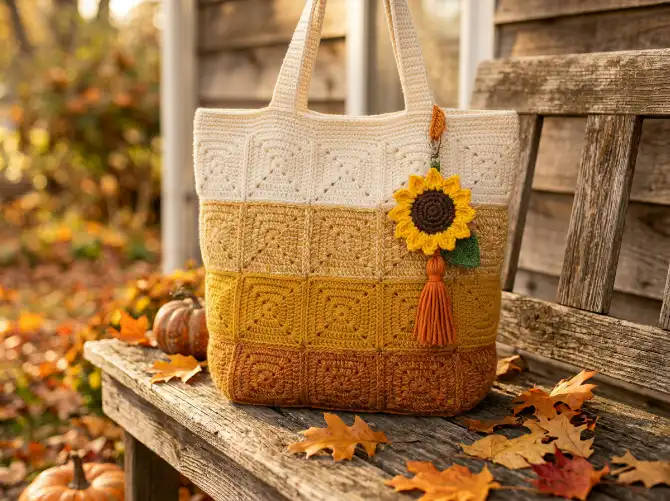
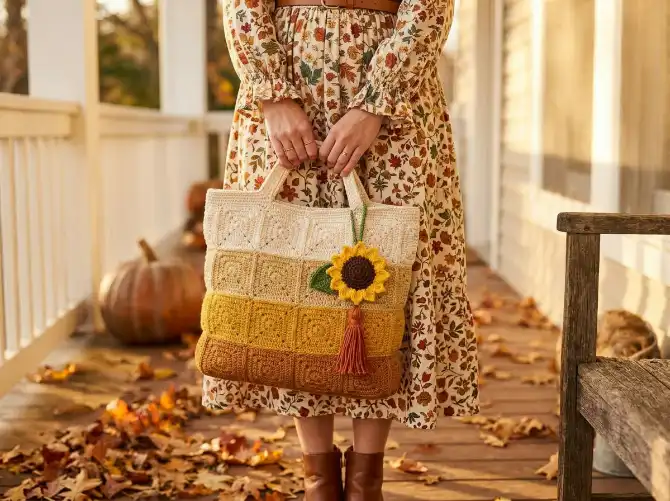
If your yarn bin is hiding leftover skeins of cream, mustard, and burnt orange, this is the project that finally puts them to work. The Golden Harvest Tote is built from color-blocked granny squares that fade from soft cream at the top down to deep burnt orange at the base, finished off with a sweet detachable sunflower charm that clips right onto the handle.
This isn’t a floppy tote that folds in on itself the second you set it on a table. The granny square grid gives it real body, and a solid single crochet border around every edge locks the whole shape in place. It’s an intermediate-level make, so you’ll want to be comfortable joining rounds and switching colors cleanly, but nothing here requires fancy techniques you haven’t seen before.
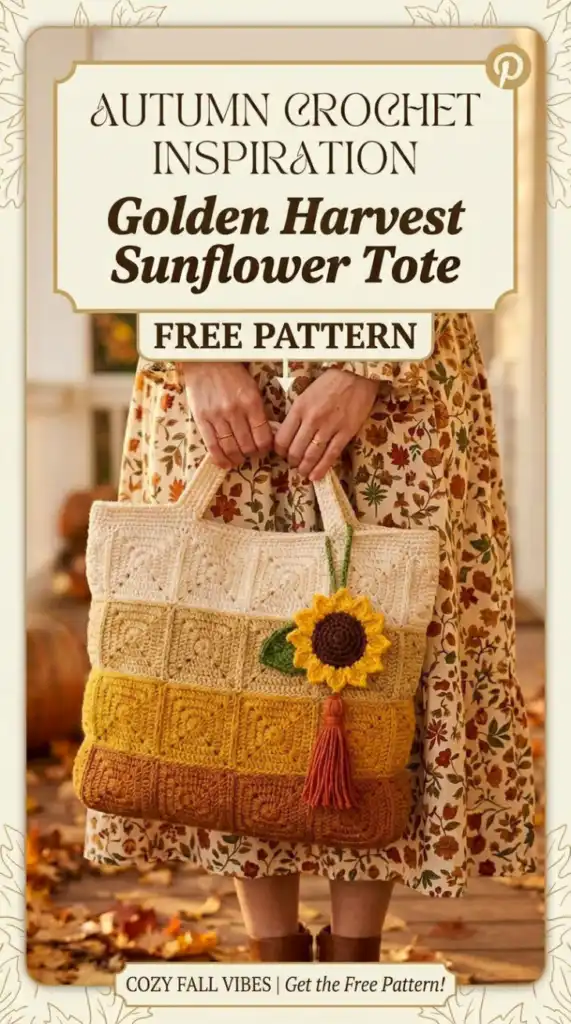
Pattern at a Glance
- Skill level: Intermediate
- Finished size: approx. 14″ wide x 14″ tall (bag body), plus a 10″ handle drop — about 24″ total height
- Time to complete: 12–18 hours for a confident intermediate maker; budget closer to 24 hours if this is your first color-fade granny square project
What You’ll Need
Worsted weight yarn
- Cream (Color A) – 300 yds
- Golden Mustard (Color B) – 300 yds
- Burnt Orange (Color C) – 200 yds
- Bright Yellow (Color D) – 50 yds, sunflower petals
- Dark Brown (Color E) – 20 yds, sunflower center
- Green (Color F) – 15 yds, leaf
- Orange (Color G) – 15 yds, tassel
Hooks
- US J (6.0mm) for the bag body and handles
- US I (5.5mm) for the sunflower charm and leaf
Notions
- Tapestry needle, scissors, 4 stitch markers
- One locking marker or small clip for the charm
- Optional: fabric lining, ~1 yard
Yarn picks that work well for this project: Lion Brand Pound of Love is a budget-friendly, machine-washable option with great stitch definition. Paintbox Yarns Simply Worsted gives you a soft, tonal autumn palette straight out of the skein. Cascade 220 Superwash is the upgrade pick if you want a more polished, boutique finish. Steer clear of slippery or overly drapey yarns (like bamboo blends) here — the bag needs structure, and slick fibers will make your squares sag.
Gauge
One finished granny square (through Round 4) should measure 3.5″ x 3.5″ after a light blocking, using the J hook. Square coming up bigger? Drop a hook size. Smaller? Size up. Gauge really matters on this one since the whole bag’s dimensions are built from these squares.
Abbreviations
- ch – chain
- ch-sp – chain space
- dc – double crochet
- sc – single crochet
- sl st – slip stitch
- hdc – half double crochet
- st(s) – stitch(es)
- sp(s) – space(s)
- RS/WS – right side / wrong side
- yo – yarn over
- FO – fasten off
- FSC – foundation single crochet
- JAYG – join-as-you-go
- rep – repeat
- beg – beginning
Special Stitches
Basic Granny Square (4 rounds)
Round 1: Magic ring (or ch 4, join to form a ring). Ch 3 (counts as first dc), 2 dc into ring, ch 2. Repeat [3 dc into ring, ch 2] three more times. Join with sl st to top of beg ch-3. Fasten off. You’ll have 4 dc-clusters and 4 corner ch-2 spaces.
Round 2: Join new color in any corner ch-2 space. Ch 3, 2 dc in same space, ch 1. Repeat [3 dc, ch 2, 3 dc in next corner space, ch 1] three times. 3 dc in beg corner space, ch 2, join to top of beg ch-3. Fasten off. (8 clusters, 4 corner spaces, 4 side spaces)
Round 3: Join new color in any corner space. Ch 3, 2 dc in same space, ch 1. Repeat [3 dc in next ch-1 space, ch 1, 3 dc, ch 2, 3 dc in next corner space, ch 1] three times. 3 dc in next ch-1 space, ch 1, 3 dc in beg corner space, ch 2, join. Fasten off. (12 clusters, 4 corners, 8 side spaces)
Round 4: Same build pattern as Round 3, with one extra cluster added per side. Ch 3, 2 dc in same corner, ch 1. Repeat [3 dc in next ch-1 space, ch 1, 3 dc in next ch-1 space, ch 1, 3 dc, ch 2, 3 dc in next corner space, ch 1] three times. Close out the round the same way, joining and fastening off if the square is being made on its own. (16 clusters, 4 corners, 12 side spaces)
Joining Squares As You Go (JAYG)
Work Round 4 of a new square, but swap chains for joins where it touches a finished square:
- Corner join: ch 1, sc into the matching corner ch-2 space on the neighboring square, ch 1
- Side join: sc directly into the matching ch-1 space on the neighboring square, no extra chains
Done this way, the seam sits flush and barely shows on the right side.
Foundation Single Crochet (FSC)
Slip knot, ch 2. Insert hook in 2nd ch from hook, yo, pull up a loop (2 loops on hook), yo, pull through first loop only, yo, pull through both remaining loops — that’s your first FSC. For each stitch after, insert your hook under both loops of the “chain” at the base of the last stitch and repeat the same yo/pull-through sequence.
Step-by-Step Instructions
Section 1 – Granny Squares (make 32)
Work these in four color groups, stopping after Round 3 on every square — save Round 4 for the joining stage:
- Group 1 (top row): 8 squares, all 4 rounds in Cream
- Group 2: 8 squares, Round 1 Cream, Rounds 2–4 Mustard
- Group 3: 8 squares, all 4 rounds in Mustard
- Group 4 (bottom row): 8 squares, Round 1 Mustard, Rounds 2–4 Burnt Orange
Check-in: squares should sit around 2.75″ after Round 3 — they’ll grow to the full 3.5″ once Round 4 is joined.
Section 2 – Front Panel
Arrange 16 squares in a 4×4 grid:
- Row 1: Group 1 (Cream)
- Row 2: Group 2
- Row 3: Group 3 (Mustard)
- Row 4: Group 4
Join Round 4 with the JAYG method, starting top-left and working left to right, then row by row, joining to both the square beside and above each new one.
Check-in: panel should measure about 14″ x 14″.
Section 3 – Back Panel
Repeat Section 2 for a matching back panel.
Check-in: both panels within 1/4″ of each other.
Section 4 – Joining Panels
Hold panels wrong sides together, right sides facing out.
- Bottom seam: Color C, join at bottom right corner, sc evenly across through both layers — 40 sc total. Fasten off.
- Right seam: Color A, join at top right, sc down the edge — 40 sc. Fasten off.
- Left seam: repeat — 40 sc. Fasten off.
Check-in: you should now have an open pouch, roughly 14″ x 14″ x 1.5″ deep.
Section 5 – Top Edge
With Color A, join at the top right corner of the opening.
- Round 1: ch 1, sc evenly around the whole opening — 40 sc across front, 1 sc per corner, 40 sc across back, 1 sc per remaining corner. Join. (84 sc)
- Round 2: ch 1, sc in each st around. Join. (84 sc)
- Round 3: ch 1, sl st in each st around. Join, fasten off. (84 sl st)
Check-in: top band lies flat, about 3/4″ tall.
Section 6 – Handles (make 2)
With Color A, FSC 82 sts.
- Row 1: ch 1, turn, sc across (82 sc)
- Rows 2–6: ch 1, turn, sc across (82 sc)
Fasten off, leaving a 24″ tail. Fold lengthwise, wrong sides together, and whipstitch the long edge closed — you’ll have a finished handle roughly 10″ x 3/4″. Make a second handle the same way.
Attaching: Position handle ends about 3.5″ in from each top corner, overlapping the inside edge by about 1.5″. Secure with a box stitch (rectangle + X across it) for strength. Repeat on the back.
Section 7 – Sunflower Charm
Center (Color E, hook I):
- R1: magic ring, ch 1, 6 sc in ring, join. (6)
- R2: ch 1, 2 sc in each st, join. (12)
- R3: ch 1, [sc, 2 sc in next] x6, join. (18)
- R4: ch 1, [sc in next 2, 2 sc in next] x6, join. (24)
- R5: ch 1, [sc in next 3, 2 sc in next] x6, join. (30) Fasten off, leave 12″ tail.
Petals (Color D): Join in any st of Round 5. [Ch 4, 4 dc in 4th ch from hook, sl st back into same sc, sl st into next sc] x15 around. Fasten off.
Leaf (Color F, hook I): Ch 12. Sc in next 3 ch, hdc in next 3, dc in next 3, 5 dc in last ch (leaf tip). Working back down the other side: dc in next 3, hdc in next 3, sc in next 3, sl st in last ch. Fasten off, leave 8″ tail.
Hanging loop (Color D): Ch 20, join to form a ring, sc 20 around. Fasten off, leave 6″ tail.
Assembly: Fold the loop in half and stitch to the back of the center disk near the top edge. Sew the leaf to the back, angled slightly to one side.
Section 8 – Tassel
Cut 20 strands of Color G, 12″ each. Fold the bundle in half. Using a separate 18″ strand, tie tightly about 1″ below the fold, wrap 4–5 times, and knot off. Trim evenly (finished length ~4″). Attach to the base of the sunflower center, then loop the whole charm over a handle.
Finishing & Blocking
Weave in ends. Soak the bag in cool water for 10 minutes, press out excess water (don’t wring), and roll in a towel. Pin to shape on a blocking board and let it dry fully for at least 24 hours. The sunflower charm itself doesn’t need blocking — if the petals curl, a light mist and a reshape by hand does the trick.
Care
Machine wash cold, gentle cycle, inside a mesh bag. Lay flat to dry — skip the dryer. Remove the sunflower charm before washing, and stuff the bag with tissue paper between uses to help it hold its shape.
Making It a Different Size
Smaller (~10.5″ square): 3×3 grid per panel (18 squares total), top border ~63 sc, handles at 64 FSC.
Larger (~17.5″ square): 5×5 grid per panel (50 squares total), top border ~105 sc, handles at 100 FSC.