Some projects look so simple that you almost skip them. This bag is one of those. I started it on a quiet evening with a ball of leftover cotton, expecting a quick practice piece. By the next morning, it was the bag I carried everywhere.
It has no tricky stitches, no complicated shaping, and no part where you need to rip everything back and start over. What it does have is a neat ribbed texture, a bag shape that stays put, and a long strap that sits comfortably across your body. It is the kind of handmade accessory people notice and ask about.

Why You Will Love This Pattern
- It is truly beginner friendly. If you can chain, single crochet, and half double crochet, you can make this bag.
- It works up fast. Most people finish it in a weekend, or over a few evenings in front of a show.
- It uses very little yarn. About 450 yards of cotton is all you need, so it is a great way to use up your stash.
- It looks polished. The ribbed bands at the top and bottom give the bag a clean, structured finish.
- It makes a lovely gift. Make one in a soft neutral color, add a button, and you have a present that feels personal.
Before You Start
Take a minute to read through the whole pattern once. Choose a cotton yarn with a little body, since a soft, stretchy yarn can make the bag sag over time. If you are new to working in the back loop only, practice a few rows on a swatch first. It is the one technique that gives this bag its ribbed look, and it is easier than it sounds.
Finally, a small request: if you enjoy this pattern, save it to your Pinterest board so you can come back to it later. I would also love to see your finished bag, so leave a comment below and tell me which color you chose.
Now grab your hook and let’s get started.
Project Description
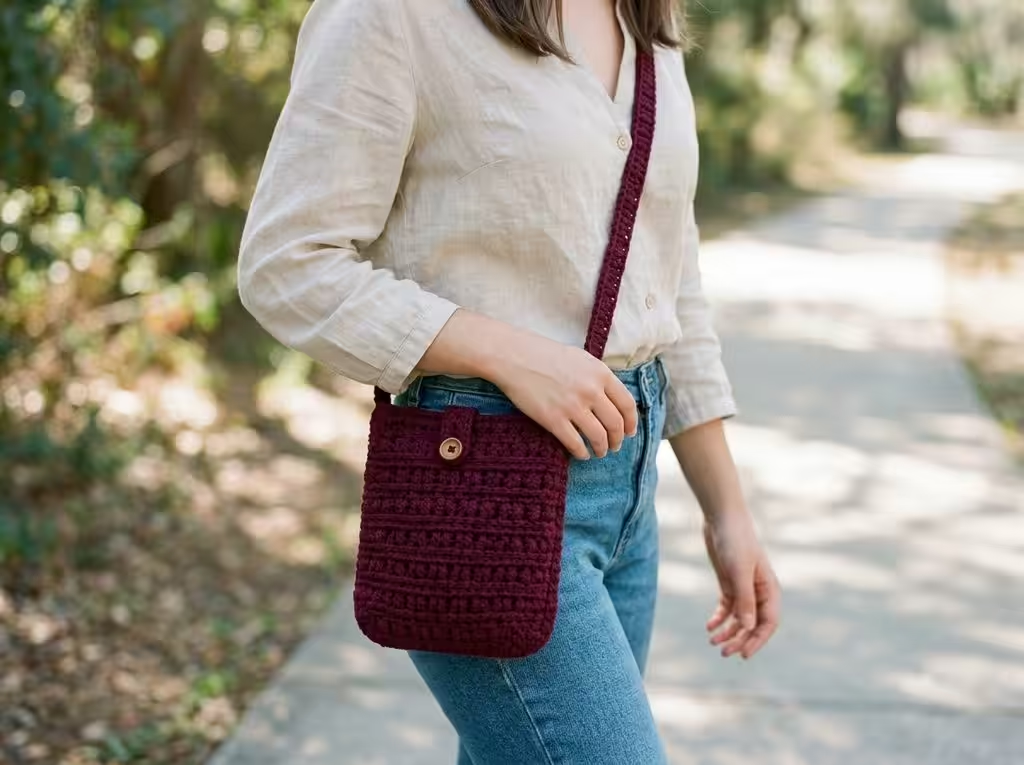
This little crossbody bag is the one I would reach for on a busy day. It holds a phone, keys, and a small wallet. The ribbed bands at the bottom and top give the bag structure, while the textured middle section adds interest without any complicated stitches.
If you are looking for an easy crochet bag pattern that works up quickly and looks store-bought, this one is a good place to start. You only need basic stitches, and the shaping is just rectangles, so it is very forgiving.
Pattern Details
| Skill Level | Beginner to easy |
| Finished Size | Approximately 8.5 inches wide x 8 inches tall (22 x 20 cm), excluding strap |
| Yarn | Worsted weight cotton yarn, approximately 450 yards (411 meters) |
| Hook | 4 mm crochet hook (US G/6) |
| Gauge | 17 hdc x 13 rows = 4 x 4 inches (10 x 10 cm) |
| Terminology | US crochet terms |
Materials and Notions
- Worsted weight cotton or cotton-blend yarn
- 4 mm crochet hook (US G/6)
- Yarn needle for weaving in ends
- Stitch markers
- Scissors
- Optional: fabric lining, a button, or a magnetic snap closure
Tip: Cotton yarn is a great choice for bags because it has little stretch, so your bag keeps its shape even after daily use.
Abbreviations
- ch: chain
- sc: single crochet
- hdc: half double crochet
- blo: back loop only
- st: stitch
- rep: repeat
- RS: right side
- WS: wrong side
Special Stitch
Half Double Crochet in Back Loop Only (hdc blo): Yarn over, insert the hook into the back loop only of the next stitch (the loop farthest from you), yarn over and pull up a loop, yarn over and pull through all 3 loops on the hook. Working into the back loop creates the ridged, ribbed look used for the top and bottom bands.
Construction Notes
The bag is made from two matching panels, one strap, and a simple edging round. Turning chains do not count as stitches. Work each panel as a flat rectangle, and keep your tension even so both panels come out the same size.
Front and Back Panels
Make 2 panels.
Row 1: Ch 37. Hdc in the second ch from hook and in each ch across. Turn. (36 hdc)
Rows 2 to 8 (bottom band): Ch 1, hdc blo across. Turn. (36 hdc)
Row 9: Ch 1, sc in next st, hdc in next st; rep from * to end. Turn. (36 sts)
Row 10: Ch 1, hdc in next st, sc in next st; rep from * to end. Turn. (36 sts)
Rows 11 to 20: Rep Rows 9 and 10 five more times. (36 sts)
Rows 21 to 26 (top band): Ch 1, hdc blo across. Turn. (36 hdc)
Fasten off after the first panel. Do not cut the yarn after the second panel if you want to continue directly into assembly.
Note: in Rows 9 to 20, the sc and hdc stitches shift by one stitch each row. This creates the small woven texture in the center of the bag.
Bag Assembly
- Place the two panels together with the right sides facing outward.
- Join yarn at one bottom corner.
- Using single crochet, join through both layers along the first side edge, across the bottom edge, and up the opposite side edge.
- Work 2 sc in each bottom corner so the bag sits flat.
- Leave the top edge open.
- Work one round of sc around the opening to firm up the edge. Join with a sl st to the first sc.
- Fasten off and weave in all ends.
Crochet Strap
Ch 7.
Row 1: Sc in the second ch from hook and across. Turn. (6 sc)
Rows 2 to 156: Ch 1, sc across. Turn. (6 sc)
Fasten off, leaving long tails for attaching.
The strap measures approximately 40 inches (102 cm), which is a comfortable length for wearing crossbody. Add or remove rows to make it shorter or longer. Sew each end securely to the inside top corners of the bag, using several rounds of whip stitches for strength.
Finishing Instructions
- Weave in all loose yarn ends carefully.
- Lightly steam block or wet block the bag to even out the stitches.
- Add an optional lining for extra durability.
- Sew on a button or magnetic snap if you want a closure.
Pattern Tips
- Keep the ribbing neat: Always work the blo rows with the same tension, or the bands may look wavy.
- Use a stitch marker: Mark the first stitch of each row in the textured section so you do not lose count.
- Change the size: For a wider bag, add chains in multiples of 2. For a taller bag, add more textured rows in pairs.
Frequently Asked Questions
What yarn is best for a crochet crossbody bag?
Worsted weight cotton is the best option. It is durable, holds its shape, and is easy to wash.
Can I make this bag without a lining?
Yes. The stitches are dense enough to hold small items. A lining is optional but helps protect your belongings.
How long does this project take?
Most crocheters finish it in a weekend, or a few evenings.
Can I sell items made from this pattern?
Please check the pattern terms on the blog before selling finished items