There’s a very specific kind of chaos that happens when you’re getting ready for an event and realize, at the last possible second, that not a single bag in your closet actually works. Too small, too casual, the wrong color, or somehow all three at once. That exact moment of “why do I own twelve bags and none of them fit a phone and a lip gloss” is basically the origin story of this design , and it’s exactly why I sat down and crocheted my way out of the problem.
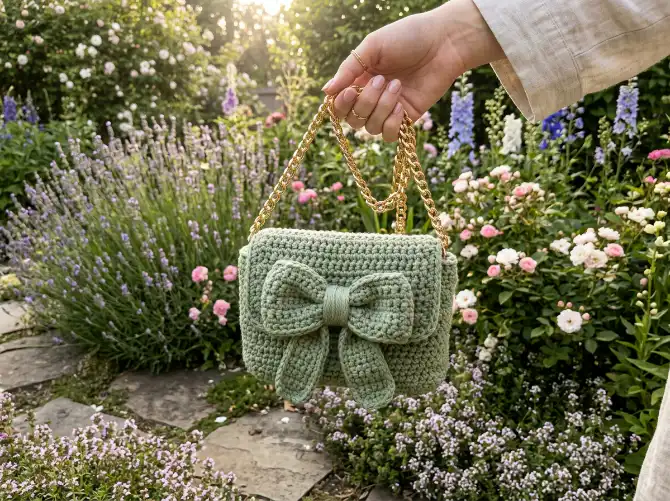
The result is this sage green bow handbag, and I’m not exaggerating when I say it might be the most-complimented thing I’ve ever made. It’s soft green, structured, topped with a big dramatic bow, and it looks like something you’d find in a boutique display case rather than something made with a hook and a ball of cotton yarn on your couch.
If you can single crochet, you can make this bag. That’s really the whole barrier to entry here.
Why This Crochet Handbag Pattern Works So Well
There’s a reason this design keeps getting saved and re-pinned all over Pinterest: it looks a lot more advanced than it actually is.
The entire body is worked in single crochet, which gives you that firm, dense fabric that holds a bag’s shape instead of collapsing the second you put your phone in it. No floppy granny-square bag vibes here , this one stands up on its own.
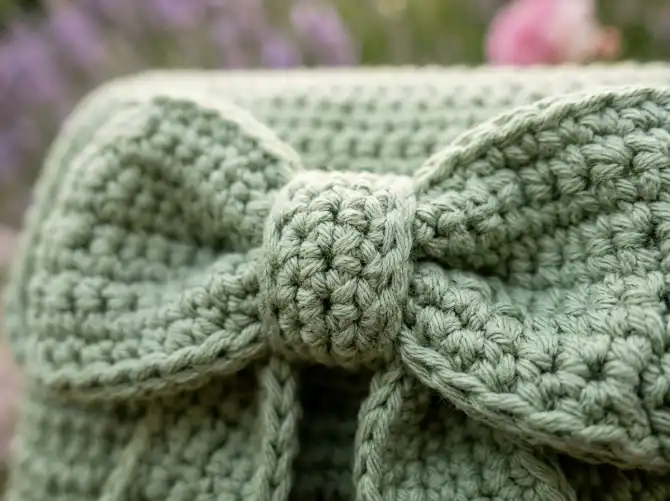
Then there’s the bow. It looks like it required some kind of complicated three-dimensional origami-level crochet technique. It didn’t. It’s a rectangle, gathered in the middle. That’s the whole trick. The proportions do all the visual heavy lifting.
And because the handle is detachable and connects through D-rings and swivel clasps, you get two bags in one: a handheld option for daytime, or swap in a longer strap and wear it crossbody.
Skill Level
Confident beginner to intermediate.
You’ll want to be comfortable with:
- Single crochet worked in rows
- Single crochet worked in the round
- Basic increases and decreases
- Simple seaming and assembly
If you’ve ever finished a basic amigurumi or a simple crochet pouch, you already have every skill this project asks of you.
Finished Size
- Bag body: about 9″ wide x 6″ tall x 3″ deep (23 x 15 x 8 cm)
- Bow: about 7″ wide x 4″ tall (18 x 10 cm)
- Handle: about 12″ long (30 cm)
What You’ll Need
Yarn
250g worsted weight cotton yarn in sage green (roughly 400 yards / 365m). A sturdy cotton or cotton-blend yarn is the way to go here , it holds structure and only gets softer with wear.
Hook
4.0mm (G/6) crochet hook. Size up or down slightly if needed to hit gauge.
Notions
- 2 swivel lobster clasps (about 1″)
- 2 D-rings (about 1″)
- Leather or faux leather strap connectors with a flower detail (optional)
- Tapestry needle
- Stitch markers
- Scissors
- A bag charm, if you’re feeling fancy (optional)
Gauge
18 sts x 20 rows = 4″ (10cm) in single crochet.
Please, please swatch for this one. Bag structure lives or dies by gauge , go down a hook size if your fabric feels loose, since a tighter gauge is what keeps this bag from sagging.
Pro Tips Before You Start
A few things that make a real difference on a project like this:
- Stay consistent with your tension. Single crochet shows every inconsistency, so if your stitches start drifting tighter or looser, take a short break and come back to it.
- Count often. A rectangular bag panel goes crooked fast if a stitch sneaks in or disappears without you noticing.
- Mark everything. Round starts, corners, anything that helps you stay oriented while working in a spiral.
- Don’t skip the swatch. It’s the difference between a bag that holds its shape and one that flops.
The Pattern
Abbreviations
- ch – chain
- sl st – slip stitch
- sc – single crochet
- sc2tog – single crochet 2 together (decrease)
- inc – 2 sc in same stitch (increase)
- BLO – back loop only
- st(s) – stitch(es)
- RS – right side
- WS – wrong side
Pattern Notes
- Worked in separate pieces, then assembled: base, body, bow rectangle, bow wrap, handle, and D-ring tabs.
- The bag body is worked in continuous rounds (no joining) unless stated otherwise , use a stitch marker.
- Turn at the end of every row on flat pieces.
- Stitch counts are given in parentheses at the end of each row/round.
Part 1: Bag Base
Ch 37.
Row 1: Sc in 2nd ch from hook and in each ch across, turn. (36 sc)
Rows 2–14: Ch 1, sc in each st across, turn. (36 sc)
Do not fasten off. You should have a rectangle roughly 8″ x 3″.
Part 2: Bag Body
Round 1: Ch 1, sc evenly around all four sides of the base: 36 sc along the long edge, 14 sc along the short edge, 36 sc along the second long edge, 14 sc along the final short edge. Place marker. (100 sc) Do not join , work in a spiral.
Rounds 2–24: Sc in each st around. (100 sc)
Round 25: Sc in next 23 sts, sc2tog around. (96 sc)
Round 26: Sc in each st around. (96 sc)
Round 27: Sc in BLO in each st around. (96 sc)
Round 28: Sc in each st around. Sl st to first sc to join. (96 sc)
Fasten off, weave in ends.
Part 3: D-Ring Tabs (make 2)
Ch 7.
Row 1: Sc in 2nd ch from hook and in each ch across, turn. (6 sc)
Rows 2–12: Ch 1, sc in each st across, turn. (6 sc)
Fasten off, leaving a long tail. Fold in half, thread through a D-ring, sew the ends together to secure.
Part 4: Attach the D-Ring Tabs
Center one tab on each short side of the bag, about ½” below the top edge. Whip stitch securely , go over your stitches twice, since these bear the weight of the bag.
Part 5: Bow Rectangle
Ch 41.
Row 1: Sc in 2nd ch from hook and in each ch across, turn. (40 sc)
Rows 2–50: Ch 1, sc in each st across, turn. (40 sc)
Fasten off, weave in ends. You’ll have a rectangle about 9″ x 10″ , it looks huge, but that’s what gives the bow its drama.
Part 6: Bow Center Wrap
Ch 9.
Row 1: Sc in 2nd ch from hook and in each ch across, turn. (8 sc)
Rows 2–18: Ch 1, sc in each st across, turn. (8 sc)
Fasten off, leaving a long tail.
Part 7: Assemble the Bow
Lay the bow rectangle RS down. Fold both short ends toward the center so they meet (folding into thirds). Pinch the center to create the gathered bow shape. Wrap the center wrap piece around the pinch 2–3 times, then sew closed at the back, catching the gathered fabric underneath. Fluff the loops into shape.
Part 8: Attach the Bow
Position the bow on the front center of the bag, about 1″ below the top edge. Sew through the back of the center wrap into the bag body with small, discreet stitches, plus a few tacking stitches on the inner edges of the loops to hold everything in place.
Part 9: The Handle
Ch 13.
Row 1: Sc in 2nd ch from hook and in each ch across, turn. (12 sc)
Rows 2–85: Ch 1, sc in each st across, turn. (12 sc)
Fasten off, leaving a long tail. Fold each short end over the bar of a swivel clasp (about 1″) and sew securely. Clip clasps onto the D-rings.
Part 10: Hardware (Optional)
Thread leather or faux leather connectors through the D-ring alongside the swivel clasp and secure per the connector’s design. Add a bag charm if you like.
Finishing Touches
Blocking: Lightly steam block. Hold a steamer a few inches above the fabric, shape while damp, let dry fully.
Lining (optional): Cut fabric slightly smaller than the bag interior, hem the edges, and hand stitch along the top inside edge.
Care: Spot clean with mild soap and cool water, lay flat to dry, reshape while damp.
Ways to Make It Your Own
- Try it in blush pink, cream, navy, or black
- Skip the bow entirely for a minimalist everyday bag
- Shrink the bow rectangle (try 30 sts x 35 rows) for something subtler
- Add a magnetic snap closure at the inside top
- Double the handle length for full crossbody wear
- Crochet the bow in a contrasting color for a two-tone look
A Handmade Gift That Actually Gets Used
This is one of those projects that reads as “I bought this somewhere nice” rather than “I made this in a weekend,” which is exactly what makes it such a good gift. Sage green flatters almost every skin tone and wardrobe, and the oversized bow gives it just enough personality without tipping into costume-y.
It’s a lovely pick for birthdays, bridesmaid gifts (a whole bridal party in matching bags is a genuinely cute idea), Mother’s Day, graduations, or teacher appreciation. Handmade accessories carry a kind of weight that store-bought ones just don’t.
If you make your own version, save this pattern to your Pinterest boards so you can find it again , and I’d love to see what color you choose for your bow.