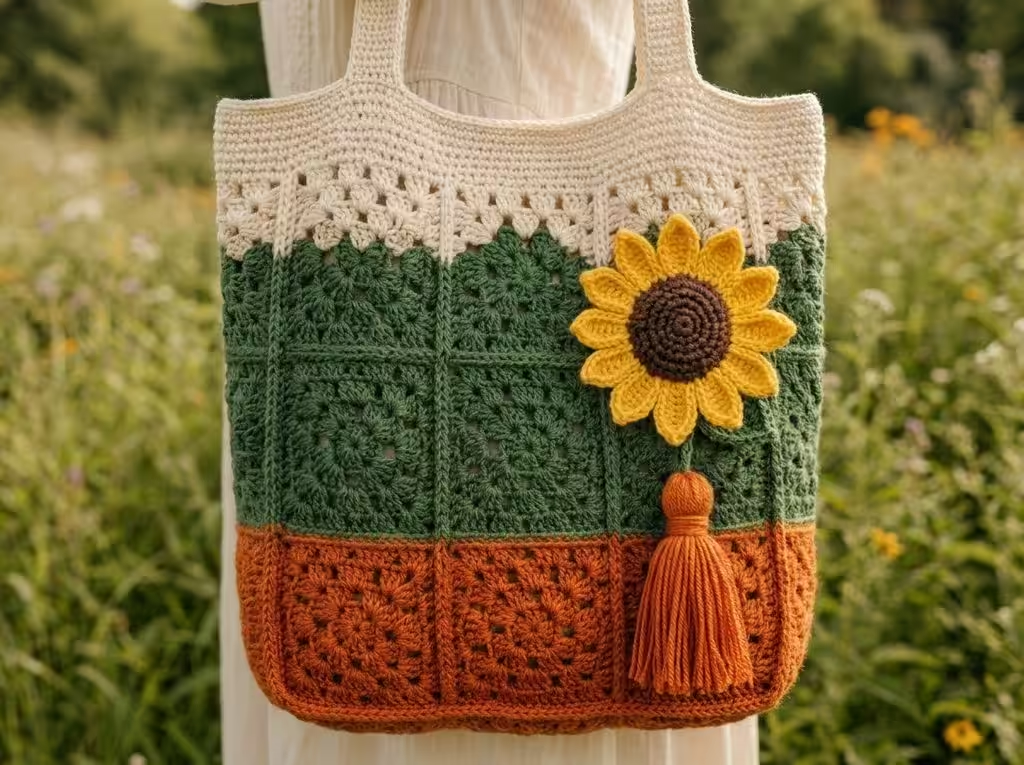
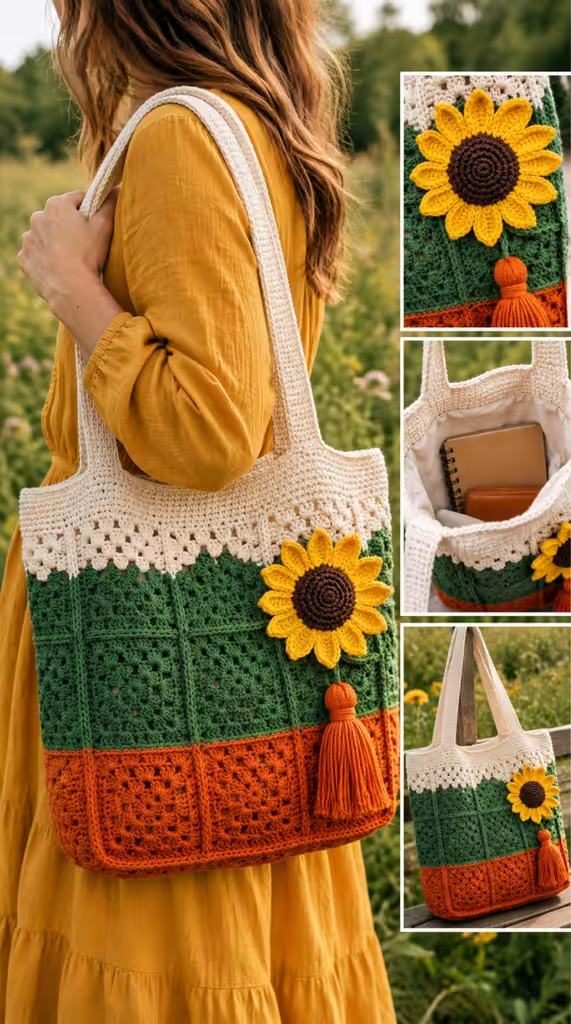
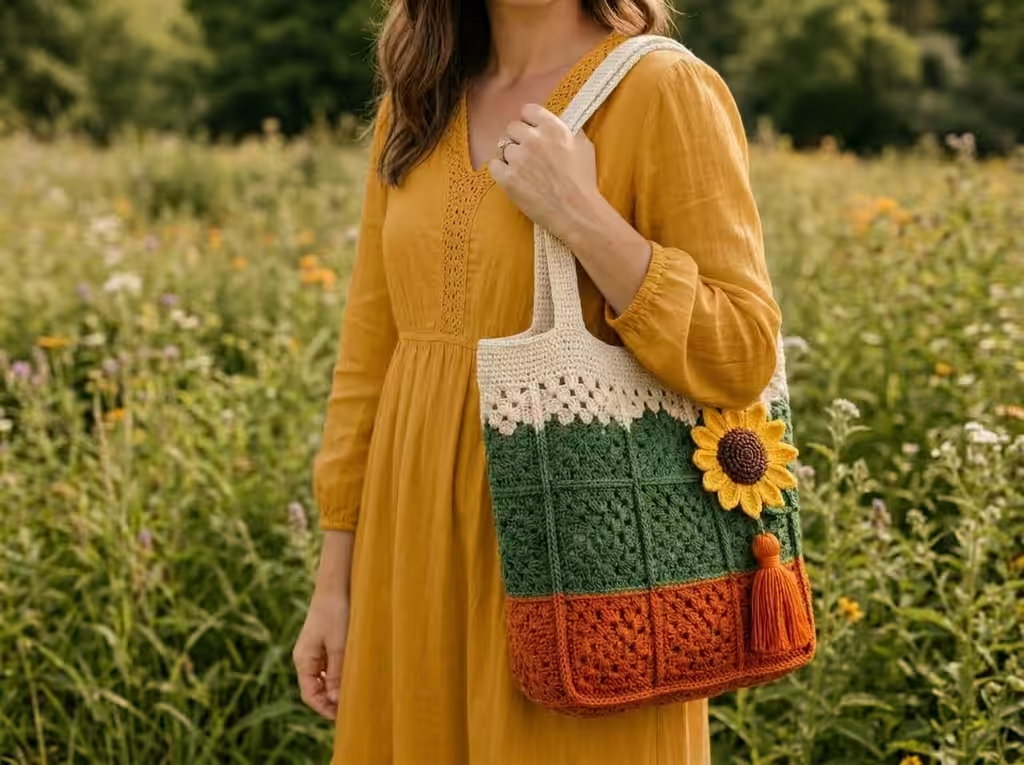
There is something about fall that makes me want to crochet a bag. This granny square tote bag crochet pattern fades from soft ivory at the rim to goldenrod in the middle and deep pumpkin at the bottom, like a field at sunset. A little sunflower charm with an orange tassel clips onto the strap to finish it.
The pattern is free and written for the intermediate crocheter. You will make 32 granny squares, join them as you go (no sewing panels together afterward), and finish with sturdy handles. If you can work in the round and change colors cleanly, you can make this bag.
Why You’ll Love This Crochet Tote
Many crochet totes slouch into a sad heap the second you put them down. This one doesn’t. The granny square grid gives the fabric natural body, and the single crochet seams and top border keep the edges firm.
The sunflower is also a separate charm, not sewn onto the bag. Unclip it before washing, or swap it for a pumpkin or leaf whenever you like.
Pattern Details
Skill level: Intermediate
Finished size: About 14 inches wide and 14 inches tall (without handles). The handle drop is about 10 inches, so the total height with handles is about 24 inches.
Time to make: Roughly 12 to 18 hours if you are comfortable with granny squares, and up to 24 hours if this is a stretch project for you.
Materials
Worsted weight yarn (medium #4):
- Color A, Ivory: 300 yards
- Color B, Goldenrod: 300 yards
- Color C, Pumpkin: 200 yards
- Color D, Sunny Yellow (petals): 50 yards
- Color E, Dark Brown (flower center): 20 yards
- Color F, Green (leaf): 15 yards
- Color G, Orange (tassel): 15 yards
Hooks:
- US J (6.0 mm) for the bag body and handles
- US I (5.5 mm) for the sunflower and leaf
Notions:
- Tapestry needle
- Scissors
- 4 stitch markers
- 1 locking stitch marker or small clip (to attach the charm)
- Optional: 1 yard of fabric, plus needle and thread, if you want a lining
Choosing Your Yarn
Pick a yarn with some backbone. Cotton or a cotton blend gives the firmest bag, and a sturdy acrylic works well too. Good options include Lion Brand Pound of Love, Red Heart Super Saver, or Lily Sugar’n Cream. Skip very silky or drapey fibers like bamboo, because they stretch and the squares will sag under the weight of your belongings.
Gauge
One finished granny square should measure 3.5 x 3.5 inches after light blocking, using the J hook. If your square comes out bigger, drop down a hook size. If it’s smaller, go up one. The whole bag depends on this, so make a test square before you commit.
Abbreviations (US Terms)
- ch: chain
- ch-sp: chain space
- sc: single crochet
- hdc: half double crochet
- dc: double crochet
- sl st: slip stitch
- st(s): stitch(es)
- sp(s): space(s)
- RS / WS: right side / wrong side
- yo: yarn over
- FO: fasten off
- FSC: foundation single crochet
- JAYG: join as you go
- rep: repeat
- beg: beginning
Stitches and Techniques
The Granny Square (4 Rounds)
Each square is worked in the round with the right side facing you the whole time.
Round 1: Make a magic ring (or ch 4 and join with a sl st into a ring). Ch 3 (counts as first dc), 2 dc in the ring, ch 2. 3 dc in the ring, ch 2. Rep from * to * 2 more times. Join with a sl st to the top of the beg ch-3. FO. You now have 4 clusters of 3 dc and 4 corner ch-2 spaces.
Round 2: Join a new color in any corner ch-2 sp. Ch 3, 2 dc in the same sp, ch 1. (3 dc, ch 2, 3 dc) in the next corner sp, ch 1. Rep from * to * 2 more times. Work 3 dc in the starting corner sp, ch 2, and join with a sl st to the top of the beg ch-3. FO. (8 clusters: 4 corners and 4 side spaces)
Round 3: Join a new color in any corner ch-2 sp. Ch 3, 2 dc in the same sp, ch 1. 3 dc in the next ch-1 sp, ch 1, (3 dc, ch 2, 3 dc) in the next corner sp, ch 1. Rep from * to * 2 more times. Work 3 dc in the next ch-1 sp, ch 1, then 3 dc in the starting corner sp, ch 2, and join with a sl st to the top of the beg ch-3. FO. (12 clusters: 4 corners and 8 side spaces)
Round 4: Same idea as Round 3, with one extra cluster on each side. Ch 3, 2 dc in the corner sp, ch 1. 3 dc in the next ch-1 sp, ch 1, 3 dc in the next ch-1 sp, ch 1, (3 dc, ch 2, 3 dc) in the next corner sp, ch 1. Rep from * to * 2 more times. Work 3 dc in the next ch-1 sp, ch 1, 3 dc in the next ch-1 sp, ch 1, then 3 dc in the starting corner sp, ch 2, and join with a sl st to the top of the beg ch-3. (16 clusters: 4 corners and 12 side spaces)
In this pattern, Round 4 is worked later during assembly, using the join as you go method below.
Join As You Go (JAYG)
When you work Round 4 of a square that sits next to a finished square, you swap some chains for single crochet joins:
- Corner ch-2 replacement: ch 1, sc into the matching corner ch-2 sp of the neighboring square, ch 1.
- Side ch-1 replacement: sc into the matching ch-1 sp of the neighboring square (no extra chains).
The result is a flat, tidy seam on the right side, and you never have to sew squares together.
Foundation Single Crochet (FSC)
This gives your handles a stretchy but strong starting edge.
Make a slip knot and ch 2. Insert your hook into the 2nd ch from the hook, yo, and pull up a loop (2 loops on hook). Yo and pull through 1 loop (this is the chain), then yo and pull through both remaining loops (this is the sc). That’s 1 FSC.
For each new stitch, insert your hook under the 2 loops of the chain you just made at the base of the previous stitch, yo, pull up a loop, yo and pull through 1 loop, then yo and pull through 2 loops.
Step-by-Step Pattern
Step 1: Make the Granny Squares (32 Total)
You’ll make four color groups, 8 squares each:
- Group 1 (top band): Color A for all rounds.
- Group 2 (second band): Color A for Round 1, Color B for Rounds 2 to 4.
- Group 3 (third band): Color B for all rounds.
- Group 4 (bottom band): Color B for Round 1, Color C for Rounds 2 to 4.
Work every square through Round 3 only. Round 4 gets worked during assembly.
Checkpoint: 32 squares, each about 2.75 inches wide. They’ll grow to 3.5 inches once Round 4 is added.
Step 2: Assemble the Front Panel
Lay out 16 squares in 4 columns and 4 rows:
- Row 1 (top): 4 squares from Group 1
- Row 2: 4 squares from Group 2
- Row 3: 4 squares from Group 3
- Row 4 (bottom): 4 squares from Group 4
Work Round 4 on each square using JAYG. Start with the upper left square; it has no neighbors yet, so it gets a regular Round 4. Move to the square on its right and join along the shared edge. Continue across Row 1, then do Rows 2, 3 and 4, joining to the squares above and beside each new one as you go.
Checkpoint: The panel measures about 14 x 14 inches.
Step 3: Assemble the Back Panel
Repeat Step 2 with the same color layout.
Checkpoint: Both panels should match within 0.25 inch.
Step 4: Join the Panels
Place the panels with wrong sides together, so the right sides face outward.
Bottom seam: With Color C and the J hook, join yarn at the lower right corner. Ch 1, then sc evenly across the bottom edge, working through both layers. Make exactly 40 sc. FO.
Right side seam: Join Color A at the top right corner. Ch 1, then sc down the right edge through both layers. Make 40 sc. FO.
Left side seam: Repeat on the left edge. 40 sc. FO.
Checkpoint: You now have an open-top bag about 14 inches wide and 14 inches tall.
Step 5: Finish the Top Edge
With the right side facing, join Color A at the upper right corner of the opening.
Round 1: Ch 1, sc evenly around the whole opening: 40 sc across the front, 1 sc in each corner, 40 sc across the back, and 1 sc in each remaining corner. Join with a sl st to the first sc. (84 sc)
Round 2: Ch 1, sc in each sc around. Join with a sl st to the first sc. (84 sc)
Round 3: Ch 1, sl st in each sc around. Join with a sl st to the first sl st. FO. (84 sl st)
Checkpoint: The top band lies flat and is about 0.75 inch tall.
Step 6: Make the Handles (Make 2)
With Color A and the J hook, work 82 FSC.
Row 1 (RS): Ch 1, turn. Sc in each FSC across. (82 sc)
Rows 2 to 6: Ch 1, turn. Sc in each sc across. (82 sc)
FO, leaving a 24-inch tail for sewing.
Fold the strip in half lengthwise with the wrong sides inside. Use the tail and your tapestry needle to whipstitch the long open edge closed, forming a tube. Make a second handle the same way.
Attaching the handles: Place one handle on the front of the bag with its ends about 3.5 inches in from the left and right top corners. Overlap each end onto the inside of the bag by about 1.5 inches. Sew each end down with a box stitch (sew a small rectangle, then an X across it) so it stays put. Repeat for the back handle.
Step 7: Make the Sunflower Charm
Flower center (hook I, Color E):
Round 1: Make a magic ring. Ch 1, 6 sc in the ring and pull it tight. Join with a sl st to the first sc. (6 sc)
Round 2: Ch 1, 2 sc in each sc around. Join. (12 sc)
Round 3: Ch 1, sc in the next sc, 2 sc in the next sc. Rep from * to * 6 times. Join. (18 sc)
Round 4: Ch 1, sc in the next 2 sc, 2 sc in the next sc. Rep from * to * 6 times. Join. (24 sc)
Round 5: Ch 1, sc in the next 3 sc, 2 sc in the next sc. Rep from * to * 6 times. Join. (30 sc) FO Color E, leaving a 12-inch tail.
Petals: Join Color D in any sc of Round 5.
Ch 4, 4 dc in the 4th ch from the hook (this makes one petal), sl st back into the same sc on the center disk, then sl st into the next sc. Rep from * to * 15 times in total, ending with a final sl st into the sc at the base of the first petal. (15 petals) FO Color D.
Leaf (hook I, Color F): Ch 12.
Row 1: Starting in the 2nd ch from the hook, sc in the next 3 ch, hdc in the next 3 ch, dc in the next 3 ch, 5 dc in the last ch (the leaf tip). Working back along the other side of the foundation chain: dc in the next 3 ch, hdc in the next 3 ch, sc in the next 3 ch, sl st in the last ch. FO, leaving an 8-inch tail.
Hanging loop: With Color D and hook I, ch 20 and join with a sl st to form a ring. Work 20 sc around the ring. (20 sc) FO, leaving a 6-inch tail.
Assembly: Fold the loop in half and sew the folded end to the back of the flower center, near the top. Sew the leaf to the lower back of the flower so it peeks out below and slightly to one side.
Step 8: Add the Tassel
Cut 20 strands of Color G, each 12 inches long. Hold them together and fold the bundle in half. Cut one more strand of Color G, 18 inches long, and use it to tie the bundle tightly about 1 inch below the fold. Wrap it around 4 to 5 times and knot it securely. Trim the ends evenly. The tassel is about 4 inches long.
Attach the tassel to the bottom of the sunflower by passing the tie thread through a few stitches on the back of the center and knotting it firmly. Then slip the charm’s loop over one handle.
Blocking and Finishing
Weave in all loose ends. Soak the bag in cool water for 10 minutes, then press out the water gently (don’t wring). Roll it in a clean towel to soak up the extra moisture, then pin it to shape on a blocking board with the top opening straight. Let it dry for at least 24 hours.
The sunflower doesn’t need blocking. If the petals curl, mist them lightly and reshape by hand while damp.
How to Wash Your Crochet Tote
Put the bag in a mesh laundry bag and wash it cold on a gentle cycle. Dry it flat, never in the dryer. Unclip the sunflower first. When you’re not using the bag, stuff it with tissue paper so it keeps its shape.
Make It Bigger or Smaller
- Smaller bag (about 10.5 inches square): Use a 3 x 3 grid per panel (18 squares total). Work about 63 sc around the top border and make the handles 64 FSC.
- Larger bag (about 17.5 inches square): Use a 5 x 5 grid per panel (50 squares total). Work about 105 sc around the top border and make the handles 100 FSC.
Tips for a Polished Bag
- Weave in ends as you go. With 32 squares in several colors, leaving it all for the end is a recipe for a very long evening.
- Keep your tension even. Use the same hook for every square so your panels come out the same size.
- Lay out your squares before joining. Arrange all 16 for each panel on the floor and check the color gradient before you start Round 4.
- Line the bag if you carry heavy items. A simple fabric lining helps the bag hold its shape and keeps small things from poking through the gaps.
Frequently Asked Questions
Can a beginner make this granny square tote bag?
It’s written for intermediate crocheters because of the join as you go method and the color changes. If you already know the basic granny square, you can learn JAYG with a few practice squares.
How much yarn do I need?
About 1,000 yards of worsted weight yarn in total, including the small amounts for the sunflower charm and tassel.
Can I use different colors?
Yes. The ombré works with any three shades that flow into each other, like pinks into reds, or light to dark blues. Keep the sunflower in yellow and brown if you want the charm to stay recognizable.
Is the sunflower removable?
Yes. It hangs from a loop on the handle, so you can take it off to wash the bag or swap it for something else.
Do I need to block it?
Light blocking is recommended. It evens out the squares, straightens the top edge, and helps the bag hold its shape.
Final Thoughts
I hope this bag ends up on your arm all season, on the way to the farmers market, the library or the pumpkin patch. If you make one, I’d love to see it, so tag me on Instagram or share a photo in the comments.
And if you want to save it for later, pin it to your favorite fall crochet board on Pinterest.
You might also like: https://maisiecrochet.com/easy-crochet-card-holde/